


A notched trowel in several sizes and shapes makes large tile installation more efficient.
Creating floors, walls and custom designs with large format tiles requires a collection of tiling tools, many dedicated just to large tile installation work. The popular large tile “planks” are hard and brittle. Then need careful handling and a successful installation relies upon using the right tools. Because large format tiles can mimic the look of wood and require fewer grout lines they can expand the look and feel of any room in your Madison WI home.
The latest porcelain tiles are available in both larger and thinner versions – some 5 feet long or longer and 1/8-inch thick or thinner. The longer, and thinner, an individual tile is the more challenging it is to handle and install.
Tiling Tools Created for New Larger Tiles
Keeping up with the demand for large tile installation, professionals have added specialized tiling tools and equipment to make the job easier. Some of the tiling tools are basic and common – plastic buckets, for example – while other are unique like specially notched trowels to increase the consistency of mortar coverage on larger tiles.
Large tile installation is as much art as science. Professionals apply years of experience and a “good eye” for layout and design as they merge textures, sizes and thicknesses for the correct finished installation. The tools applied to the job bring science into the equation. There’s no substitute for the right tiling tools, especially with the new large format tiles. Trying to make the wrong tool work can damage expensive tile and even result in an injury.
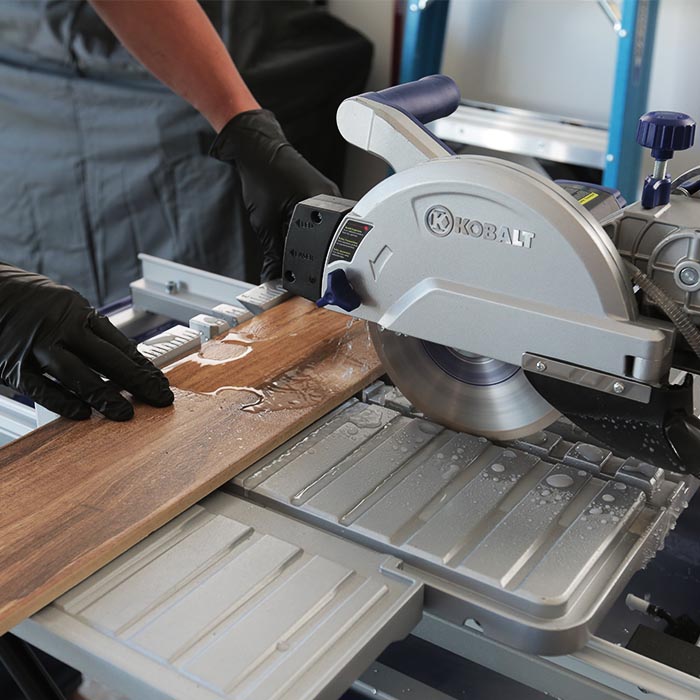
Cutting tile is a major component of large tile installation and a wet-saw with diamond-tipped blade is a must have among tiling tools.
Obtaining all the right tools for the job is an expensive proposition, especially if you’re planning a one or two room home remodeling project. There are options: renting specialized tiling tools, or bringing in a professional who not only has all the tools, but knows how to use them properly.
Large tile installation is demanding and there’s no skipping steps or taking shortcuts. Before you make a decision, consider the tools required to do the job. Some are basic while others are specialized:
- Tile Cutters – a good manual tile cutter is the most versatile tool in the bag. It should be lightweight and easy to handle – with one hand. Designed for making clean, precise cuts without damaging the surface of the tile. Look for a manual cutter with different settings if you’re doing a large tile installation – 26-, 36- and even 60-inc cuts make sense with large format tiles.
TIP FROM A PRO— Large format tiles are more demanding than more common smaller tiles and require a product that’s designed specifically for them. These tiles can be difficult to handle and delicate to cut and drill without leaving rough or chipped edges – the problem isn’t the material, it’s the tools and how they’re handled.
- Tile Saws – A perfect fit requires using a high-quality tile saw. Unlike most DIY saws for remodeling jobs, tile saws use specialized blades and operate at extremely high speeds so they can cut through hard materials leaving a clean edge. Diamond-edged saw blades are the optimum choice. Again, make sure the saw will handle the size tile you’re using.
- Diamond Drill Bits – Drilling tile requires precision, skill and top-quality tiling tools. Drilling a precision hole without cracking or chipping the tile takes practice – large format tiles are too expensive to practice on. A drill bit selection makes sense in a room where different sized holes are likely – investigate the layout well in advance. Drill bits designed for “wet cutting” protects the tool from extreme heat while reducing dust.
TIP FROM A PRO— If you’ve never used a diamond drill bit before, PRACTICE. These specialized tiling tools don’t work just like the bit you drill into wood and you can ruin a vital piece if you make a mistake.
- Mortar Mixer – the right mortar consistency is vital for large tile installation and a mixer to keep batches ready when needed makes the process easier. Large tiles require more mortar per tile and keeping the required amount evenly mixed and ready is vital. Mixers with variable speeds, paddle options and heavy-duty motors are ideal.
- Tile Trowels – of all the tiling tools, trowels are the most vital. Trowels for large format tiles are larger and have a jagged edge pattern of notches – square notches or a u-notch – are common recommendations. Having both makes sense. Having trowels of different sizes makes sense, too for proper finishing work. Most mortar suppliers offer recommendations for the best design to use with their product.
TIP FROM A PRO— Many professional tile installers suggest that for complete adhesion, large format tiles should be “back buttered” – meaning the backside should be completely covered with mortar to insure no gaps where the thin tiles can crack after extended periods of use.
- Chalk Line – Never assume a room is perfectly square. Before laying the first tile, a chalk line can make sure the large tile installation is square. Chalk lines guide installation via a dry run to determine the preferred tile pattern and check for potential problems.
- Leveling System – Maintaining a level floor or wall as well as keeping tiles level with themselves is critical to a professional installation. A system to monitor the whole layout during installation keeps the process on track and can save headaches if an uneven area is spotted too late for an easy recovery.
- Grout Floats – grout fills the spaces between tiles to provide an even, finished surface while locking the tiles together. These tiling tools spread grout evenly over large surfaces. Some are designed to work is difficult, hard to reach areas. Consider the finished project – you may need more than one size and shape.
- Tile Spacers – throughout time there have been dozens of make-shift spacers used for tile. Large tile installation requires more precise tiling tools right down to the spacers. Spacer material isn’t as critical to the finished project as consistency, especially using long, plank-like tiles.
Tiling Tools for Comfort, Precision
The term tool often refers to a piece of hardware. When it comes to installing tile, there are two tools that just make the job easier. One is a common household item and the other is often overlooked:
- Rubber of Plastic Bucket – the good ol’ 5-gallon bucket that’s used all over the home. You use it to transport mortar from the mixer to the site.
TIP FROM A PRO— If you’re buying new buckets, opt for rubber buckets in a couple different sizes. Rubber is easier to clean than plastic when you’re transporting mortar, even when the mortar is completely dry it comes out of a rubber bucket easier than a hard plastic one – the sides of the rubber bucket flex enough to break it loose.
- Knee Pads – when you’re installing a new floor, knee pads are a must. Consistently bending and kneeling puts a lot of strain on delicate knee joints and a good pair of knee pads are listed as tiling tools that make the job not only more comfortable but safer, too.
- Rubber Mallet – heavy-headed hammers are a risk to delicate tile. When tile needs to be settled into the mortar bed and snugged to adjoining tiles, a rubber-headed mallet provides the force while protecting the surface.
- Abrasive Sponge – it’s best to remove grout haze as the work progresses. A simple bucket of water and a sponge with an abrasive surface is all that’s required. Keeping the sponge damp it can clean up the “haze” and loosen any grout residue during large tile installation. The abrasive side is necessary for grout that has already begun to dry – and is also a valued tool a day or so after the tile is installed for last-minute clean up.
Professional Service, Advice Makes Tool Selection, Use Easier
For creative tile design ideas, and the latest large format tiling trends, contact Molony Tile, a source for unique, durable and elegant tile solutions in Madison WI and greater Dane county including Middleton, Waunakee, Verona, Fitchburg, McFarland, Oregon, Stoughton, Cottage Grove and Sun Prairie.
Call or email Molony Tile, 608-268-8453 for large tile installation services and the right tiling tools for your project in Madison WI.